Occupancy sensors are becoming increasingly popular in homes and commercial buildings alike. They not only provide convenience by automatically turning lights on and off, but they also help save energy by ensuring that lights are only on when needed. If you're looking to install a 3-way occupancy sensor in your space, follow this wiring diagram and step-by-step guide.
First, gather all the necessary tools and materials for the installation. You will need a voltage tester, wire strippers, a Phillips screwdriver, and a 3-way occupancy sensor switch. Before beginning any electrical work, make sure to turn off the power to the circuit you will be working on at the circuit breaker.
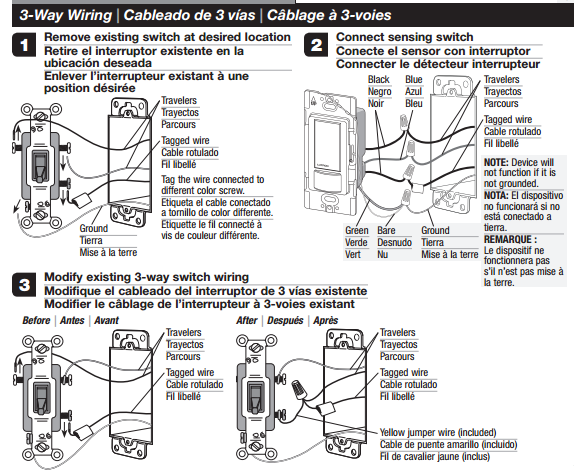
1. Locate the existing light switch you want to replace with the occupancy sensor. It is a good idea to take a photo of the existing wiring for future reference.
2. Carefully remove the cover plate from the existing switch and unscrew the switch from the electrical box. Pull the switch out and inspect the wiring. Most switches will have a line (hot), load (to the light), and ground wire.
3. Use the voltage tester to confirm that the power is off. Touch one end of the tester to the line wire and the other end to a ground wire. If the tester does not light up, it is safe to proceed.
4. Now, let's connect the occupancy sensor switch. Start by connecting the ground wire from the switch to the ground wire in the electrical box. This wire is usually bare or green.
5. Next, connect the line wire from the electrical box to the line wire on the occupancy sensor switch. This wire is typically black.
6. Connect the load wire from the electrical box to the load wire on the occupancy sensor switch. This wire is typically red or another color.
7. If the occupancy sensor switch has additional wires, such as traveler wires for a 3-way switch, refer to the manufacturer's instructions for proper wiring.
8. Once all the wires are connected, carefully push the wires back into the electrical box. Screw the occupancy sensor switch into place using the provided screws.
9. Finally, screw the cover plate onto the occupancy sensor switch.
10. Turn the power back on at the circuit breaker and test the occupancy sensor switch. Walk in front of the sensor and verify that the lights turn on automatically.
Congratulations! You have successfully installed a 3-way occupancy sensor switch. Enjoy the benefits of convenience and energy savings that this smart technology provides.
As you can see, installing a 3-way occupancy sensor switch is a relatively straightforward process. However, if you are uncomfortable working with electrical wiring, it's best to hire a licensed electrician to ensure a safe and proper installation.
Keywords: 3-way occupancy sensor, wiring diagram, install, switch, installation guide, electrical wiring, convenience, energy savings, smart technology.